It's shockingly easy to create your own icons in Windows XP. Let's do it: Click Start, click All Programs, click Accessories, and then click Paint. On the Image menu, click Attributes. Type 32 for both the Width and Height of the document, and make sure that Pixels is selected under Units. Click OK to create a new 32x32-pixel document: the size of an icon.
Now add type, color, or do whatever you'd like to your image. I like to shrink photos (headshots work best) to 32x32 and simply paste them into my Paint document. When you're finished, open the File menu and click Save As. Use the dialog box to choose where you want to save your file, then give it a name followed by ".ico" (without the quotes), and click Save. (The extension ".ico" tells Windows that it's an icon file.) You just created an icon! Now you can change any shortcut or folder to your own icon—just browse to it on your hard drive.

Related links:
- Speed up browsing in Windows XP
- Launch multiple programs in Windows XP
- How to update your Windows
- Registry hack to speed up Windows
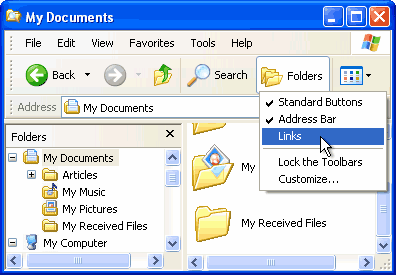
Add the Links toolbar to My Computer
You know what would make a great toolbar? One where you could put your favorite applications and documents so that you could open them from any window at any time. Guess what? You can and here's how: click Start, then My Computer. Now right-click the toolbar and then click Links. You now have the Links toolbar on your windows, just like in Internet Explorer. Note: Make sure that Lock the Toolbars is not checked. Click on it to deselect it if it is.
The really cool thing about the Links toolbar is that it's completely customizable. Try this: Navigate to your favorite application and drag and drop its icon to the Links toolbar. You just created a shortcut. Do this again and again for as many applications as you want to appear on the toolbar.
Related links:


